You are visitor number: Loading...
Introduction
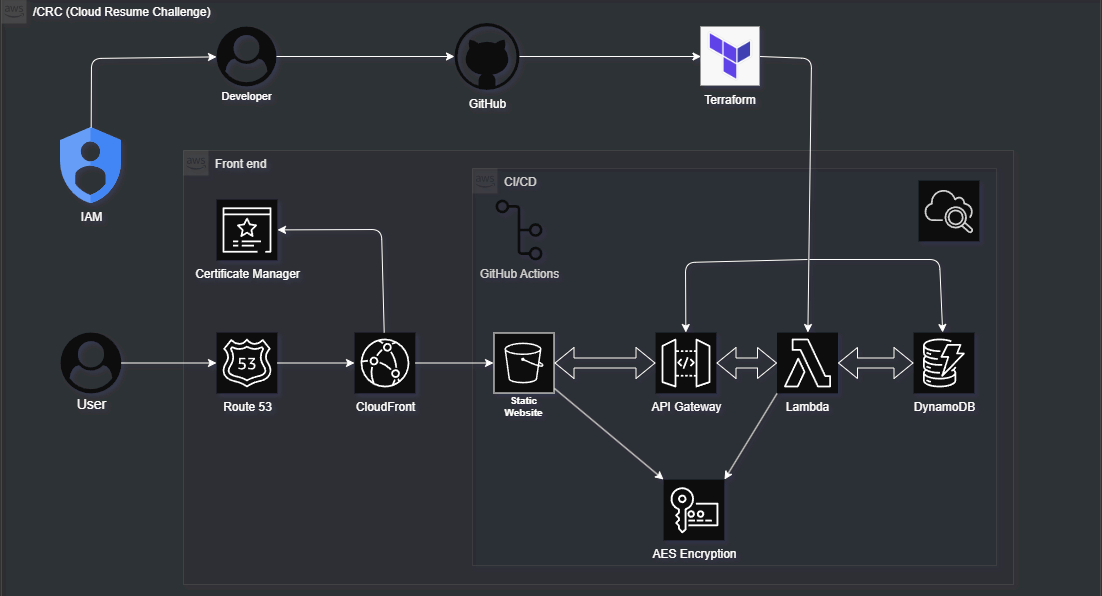
As part of my journey into cloud engineering, I took on the Cloud Resume Challenge. It’s a hands-on project that brings together key cloud skills. S3, Lambda, DynamoDB, API Gateway, IAM, and Terraform to build and deploy a serverless resume site. Entirely in the cloud. Disclaimer, i do not have my actual resume on this page however this project fulfills the Cloud Resume Challenge. You can find my up to date resume on my home page or linkedIn
In this blog post, I’ll walk through the process I followed and what I built.
Tech Stack
- AWS S3, CloudFront, Route 53, ACM
- Lambda, API Gateway, DynamoDB
- Terraform, GitHub Actions
Phase 1: Static Resume Website with S3
This phase was actually pretty easy. I have some history with web design and am pretty comfortable with HTML/CSS — especially from the Myspace Era. I wanted to speed through this so I just used a CSS template and updated it with my info.
Something I learned here was about S3 buckets — what they do and how to use them. I started by creating a simple HTML version of my resume and hosted it on S3 bucket static site The goal was to get a static site online without a traditional web server.
- Wrote my simple index.html
- Created an S3 bucket with a globally unique name
- Enabled static website hosting
- Uploaded my HTML file
- Set proper permissions for public read access
Boom. live from a public S3 URL. THIS public URL actually
Phase 2: HTTPS with Custom Domain
CloudFront + HTTPS Deployment via AWS CLI
- Issued a new ACM certificate in the correct region for
CloudFront compatibility
us-east-1 - Used Route 53 DNS validation to verify domain ownership hagedorny.dev
- Created a custom CloudFront distribution using a manually crafted cloudfront-config.json
- Configured:
- S3 static hosting as the origin main-portfolio-dev
/CRC/index.htmlas the root object - HTTPS redirection using the ACM certificate
- S3 static hosting as the origin main-portfolio-dev
- Deployed CloudFront with:
aws cloudfront create-distribution --distribution-config file://cloudfront-config.json
First Blocker: ACM Certificate Not Appearing in CloudFront
While configuring CloudFront with a custom domain hagedorny.dev
I encountered an issue:
The ACM certificate we requested wasn't showing up in the CloudFront UI dropdown.Root cause: ACM certificates must be issued in the us-east-1 (N. Virginia) region to be used with CloudFront. My certificate was initially created in us-east-2 (Ohio) which made it invisible to CloudFront
Fix + Workaround
- Reissued the certificate in the correct region
us-east-1 - Used Route 53 DNS validation to confirm domain ownership
- When the console UI failed to recognize the cert:
- Switched to the AWS CLI
- Created a full CloudFront distribution using
cloudfront-config.json - Specified the ACM cert ARN manually
- CloudFront deployment completed successfully via CLI
Phase 3: Serverless Visitor Counter (Lambda + API Gateway + DynamoDB)
This stage was fun and packed with a lot of new information. I have some experience with Python from working in the game industry — I've used it to build tools and automate 3D workflows. I'm not an expert, but I’m past the point where code looks like gibberish.
Throughout this phase, I was able to level up some new skills and build a visitor counter using AWS serverless tools:
- DynamoDB to store the visit count — a NoSQL database that stores document-based structures and scales automatically.
- Lambda function (written in Python) to increment and retrieve the count. Lambda runs a single function without a server.
- API Gateway to expose the Lambda function as an HTTP endpoint.
- CORS was enabled so my frontend could fetch the data — this allows a browser to access resources from another domain.
This part required configuring IAM roles, setting resource permissions, and testing/debugging with logs from CloudWatch.
Debugging errors around permissions and DynamoDB types taught me a lot about how Lambda and AWS services interact under the hood.
Phase 4: Infrastructure as Code with Terraform
In the interest of operating like a real Cloud Security Engineer, I decided to put Terraform to use. Having never used it before, it was a bit challenging at first — especially understanding how to write commands and structure `.tf` files. But once I got the hang of it, it reminded me of tools like Perforce or SmartGit — except all in code, and without having to manually select files for each update.
I ran into a small issue where my Lambda deployment package wouldn't create or hash properly. After debugging (with some help from AI tools), I realized it was because I had originally created the Lambda function through the AWS Console. Terraform didn’t know about it, so it tried to create a duplicate and failed.
I resolved this by importing the existing AWS Lambda function into Terraform, then re-applying my changes from there. This taught me how Terraform tracks infrastructure state and how to bridge the gap between console-created and code-managed resources.
Resources I Converted to Terraform:
- Defined my S3 bucket and static website hosting configuration
- Imported the live bucket to avoid rebuilding infrastructure
- Wrote a separate aws_s3_bucket_website_configuration block
- Plan to add resources for Lambda, DynamoDB, and API Gateway next
This step helped me practice automation, reusability, and infrastructure version control — core skills for any cloud engineer.
Phase 5: Security & Best Practices Summary
S3 Bucket Security Enhancements
- Enabled S3 Server-Side Encryption:
- Applied SSE-KMS using the AWS-managed key (alias/aws/s3).
- Enabled bucket key to reduce KMS request costs.
- Enabled Versioning on the Resume Bucket:
- Allows rollback and auditing of previous versions of files. not really needed because of there isnt anything special in this bucket and im using version control via git. also the resume isnt real.
- Refactored to Modern Terraform Resources:
- Used aws_s3_bucket_versioning and aws_s3_bucket_server_side_encryption_configuration instead of deprecated attributes.
- Made Public Access Configurable:
- Used a variables.tf + terraform.tfvars approach to toggle public access settings for dev vs. prod.
- Implemented a dynamic switch using var.block_acls and var.block_public_policy.
S3 Access Logging Setup
- Created a Dedicated Logging Bucket:
- cloud-resume-access-logs-{random_suffix} — used random_id for uniqueness.
- Enabled Access Logging on Main Resume Bucket:
- Configured aws_s3_bucket_logging to send logs to the logging bucket with prefix log/.
- Secured Logging Bucket with a Bucket Policy:
- Allowed only the AWS S3 logging service to write to the bucket.
- Locked down write access using an aws:SourceAccount condition.
- Next Step: Integrate logs into a SIEM or API-based viewer for easier monitoring and analysis.